The Login widget
Most applications can settle on implementing UNLOQ with the custom login widget, a small <script> snippet that you can include in your login page's HTML. It works by creating an IFrame next to the widget script, containing the UNLOQ login form. The location where you place the script in the DOM is where the IFrame will be loaded.
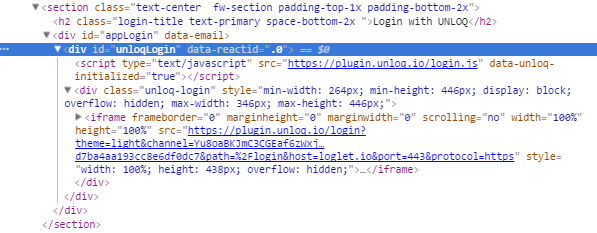
You can find the script widget by accessing your application's Settings - API menu, inside the Login widget script tag card. The end result would consist of a div and an iframe, as displayed in the image below. Note that the login widget can only be loaded on the application's origin domain. Including the script on any other domain will result in displaying an error.

The default authentication flow
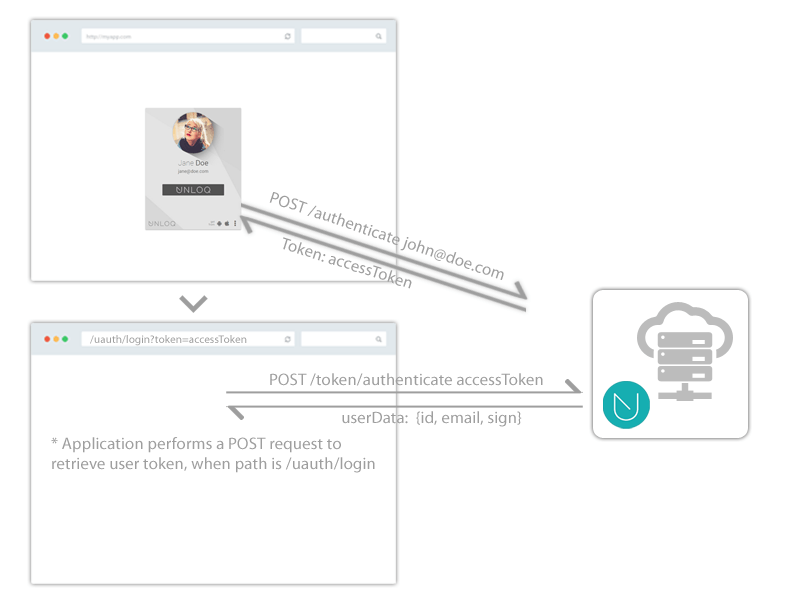
In the default widget implementation, the authentication flow is described in the image below. The process begins with the UNLOQ iframe being created and loaded inside the user's browser. Once he clicks the UNLOQ button, it will perform an AJAX call to our servers that will be routed to the user's device. If the user accepts the authentication request, an access token is generated and returned to the iframe.
The iframe will then redirect the user's browser to the object, containing a callback and pass the access token in the querystring, under ?token={accessToken}. Your back-end application will then use the token to call the UNLOQ api to fetch the associated user information. Once the user data has reached your server, it can then create a user session and redirect the user to his dashboard.
Note that the generated access token will expire after one minute and can only be used once. If you
fail do so, you can just tell the user to re-initiate the authentication flow.
Applications that have enabled remote logout must also send the user's generated session id (optionally
the session duration). The session id will only be relevant when the user chooses to login with push
notifications,
as it will be sent and stored directly to the user's device. Other authentication methods do not make use of
remote
logout, therefore discarding the session id.

Script tag attributes
When including the <script> tag inside your login page, there are a few attributes that you can add in order to personalize the login widget.
- data-unloq-key - this is a required attribute you must include so that the script can identity your widget and application
- data-unloq-theme - this enables you to change the theme of the login box. We currently offer two themes: light and dark
- data-unloq-init - an optional name of a function that can be found under window[functionName]. As soon as the widget is loaded up and setup, we will call this function if provided.
- data-unloq-email - an optional e-mail you can send to pre-populate the e-mail field of the plugin.
Customizing the token passing mechanism
In the next paragraph, we're going to talk a bit about the data-unloq-init attribute. If you're developing a single-page application and you want your authentication mechanism to call one of your API's endpoints instead of using the login widget's URL, you can specify this attribute and have the callback function return an object, containing a callback property that is a function. The flow can be viewed in the below example
<script type="text/javascript">
   (function(){
      function onTokenReceived(accessToken) {
         // Call your API with the user's access token
         console.log("UNLOQ access token", accessToken);
      }
      window.onUnloqInit = function OnUNLOQInit() {
         return {
            callback: onTokenReceived, // Once a user logs in and an UNLOQ access token is generated,
                                       // call this function instead of performing the browser redirect.
            public_key: "PEM-encoded public key" // Optionally, include a public key when requesting the
                                                // user's personal encryption key.
         }
      }
   })();
</script>
<div class="unloq-login">
   <script data-unloq-key="{YOUR_API_KEY}" data-unloq-init="onUnloqInit"></script>
</div>
The above example contains a simplified proof-of-concept on how you can intercept the access token and use a separate AJAX API to your back-end in order to create the user's session. This way, you can integrate the UNLOQ login widget with your own single-page application without relying on an additional GET endpoint that would handle the login redirect.
Have a question? You can always send us an email at support@unloq.io, or contact us on chat.
For security related concerns, please visit our Security page.

