Widgets
With widgets, you are able to integrate your front-end application with UNLOQ’s functionality by including a <script> snippet in the HTML page where you want it to be.

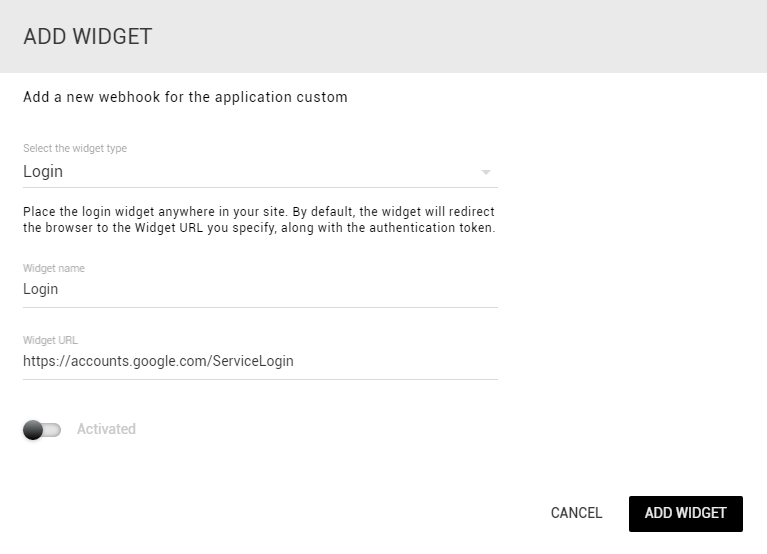
To add a widget click the New widget button on the right, and then select the Widget type, Widget name and Widget URL (the URL where you will integrate the widget).

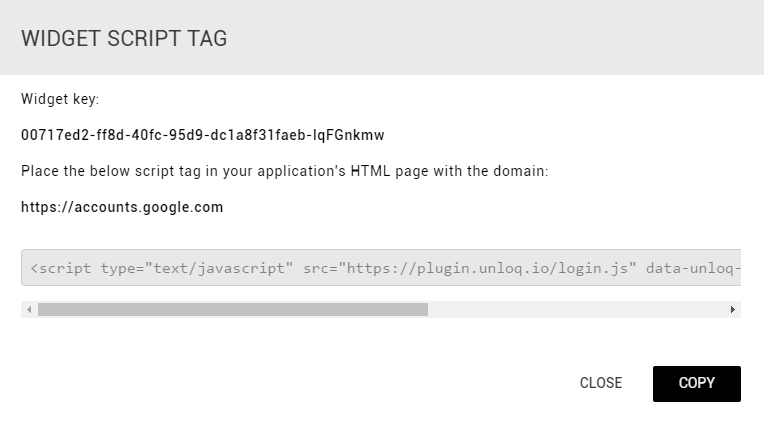
When integrating with UNLOQ through the login widget, or any other widget, your Widget key is the public credential identifying your own application, being used in the widget's script tag. This key is assigned to your widget on creation and it is never changed.
You can also decide whether one particular widget is activated or not, which you can change at any time, depending on your needs.
Currently, there are 5 available widget types:
Login
The login widget is used to provide out-of-the-box login functionality to your site. It can be used in two ways: via browser redirect or via JavaScript token retrieval.
If you are developing a single-page application, you can register a callback function via UNLOQ.onLogin(fn) to handle the authentication token yourself, after the included login script.
If you plan on using the Login widget for user authentication, you can simply copy and paste the displayed script tag into your application's login page HTML. When including the widget script tag into your application's HTML, you must provide the data-unloq-key attribute, as presented in the snippet. Additional attributes can also be specified such as data-unloq-email to pre-populate the email field or data-unloq-init to specify the name of the function that will be called once the plugin is loaded.
An in-depth presentation of how you can integrate the login widget can be found here.
Confirmation
The confirmation widget is used when a new user confirms his account or links their device to their account. By default, the end user will see the UNLOQ confirmation widget. However, adding this widget to your application will enable you to use your own branding.
If you are developing a single-page application, you can register a callback function via UNLOQ.onConfirm(fn) to handle the confirmation information yourself, after the included login script.
Register
The register widget enables you to include user registration out of the box in your application.
If you are developing a single-page application, you can register a callback function via UNLOQ.onRegister(fn) to handle the register information yourself, after the included login script.
Deactivate
The deactivation widget enables users to initiate the device deactivation process. By default, they can do so by accessing unloq.io/deactivate. If you define your own deactivation widget, you can use your own branding on it.
If you are developing a single-page application, you can register a callback function via UNLOQ.onDeactivate(fn) to handle the deactivation information yourself, after the included login script.
Logout
The logout widget periodically checks if a user has performed remote logout or not, so that you can instantly react on the logout action. By default, it will redirect the user to the specified widget URL. However, you can add your own functionality by registering a callback function via UNLOQ.onLogout(fn).
Domain verification
Once you created the widget, you must Verify the domain, under the Actions button. The domain verification can be done in 2 ways: by creating a .html or .txt file and placing it in the domain’s root folder, or through the DNS provider by creating a TXT record. For more information, see Verifying a widget domain.
Once the domain is verified, you must also place the received Script tag in your application's HTML page, on the domain you've specified.

After adding your first widget, you will activate the search feature, and if you ever want to remove one of the widgets created, you can do so using the Delete button in the actions menu.
Have a question? You can always send us an email at support@unloq.io, or contact us on chat.
For security related concerns, please visit our Security page.

